...the "Big D"! We're in Anaheim for Jeremy's work. His school received the California Distinguished School Award and this weekend is the big awards ceremony and banquet at the Disneyland Hotel. Our parents were both available to watch our kids so we got to come down just the two of us. Parents rock!
We had lunch today at the infamous restaurant you see when riding Pirates of the Caribbean - The Blue Bayou. That Monte Cristo sandwich was a meal to remember... the raspberry dipping sauce, the Cajun potatoes, and the egg-battered/fried sandwich are now fond memories.
More pictures and updates will follow over the next few days. For now, we are enjoying our time in "the happiest place on earth".
Friday, May 29, 2009
Tuesday, May 26, 2009
Friday, May 22, 2009
It's Great to be EIGHT!!
Thursday, May 14, 2009
spock + kirk = loads of fun
So I suppose you can call us "trekkies", but not "trekkers". From what I've been reading "trekkies WATCH Star Trek" and "trekkers LIVE Star Trek" (as in...they have Star Trek themed weddings, go to Star Trek conventions dressed in costume, and name their children and pets after characters). We are not die hard trekkies either. Jeremy watched the original Star Trek with Captain Kirk when he was younger. And I watched Star Trek the Next Generation with Captain Picard when I was growing up - my whole family did. We loved that show! Basically, the point of this whole history is, we both have a general knowledge of Star Trek and it's characters.
The reviews came out about this movie and they all ranted and raved about how awesomely wonderful fantastic it was and we decided that we needed to see it too. Last weekend we went out for date night with our Costco movie tickets and saw this new Star Trek movie.
It was great from the start. Actually it was great even before the start - those previews were so much fun! We can't wait for Transformers 2! Beware of that first opening scene. I was almost bawling in my seat - I was so drawn in even in those first few moments! We both enjoyed the whole thing. The back story on all the characters was so enjoyable to watch unfold. They dynamics between all those characters were interesting and comical. I especially enjoyed watching Kirk and Spock interact at their first few meetings - you'll like it too - I know it! The special effects and computer generated images were all fabulous as well...blah blah blah on all that technical stuff - we just like the action, comedy and entertainment factor.
My favorite character was Spock. Maybe it's because we've watched that guy (what's his name?) on the TV shows Heroes and then 24. He did an excellent job in this role. Leonard Nimoy made his appearance in the movie also - I wasn't expecting that, so hopefully I didn't just spoil that surprise for you. It was neat to see him side by side with the new Spock (his name is Zachary Quinto - just looked it up). Although there was no sign of William Shatner anywhere. I read in some magazine that he didn't even get an invite to appear in this movie. That seemed strange. But no matter, that's neither here nor there. There also seemed to be several actors from the TV show Felicity that showed up in this movie (sorry no Keri Russell for you Keri Russell fans out there...). That's probably due to the fact that the director of Star Trek, J.J. Abrams, also directed Felicity. Anyway, enough of those ramblings...
We recommend this movie to trekkies, trekkers, and those that enjoy a little sci-fi adventure. I don't think we'd take our 7 and 9 year old kids though, still too old for them. It is PG-13 after all.
All in all we give it 5 drops of red matter out of 5.
What did you think? Was it as good as they said it would be?
Tuesday, May 12, 2009
Trevor does Track
Trevor started his first season of track a few weeks ago and Friday was his first meet! He was excited to compete in two events - the 800 meter run and shot put.
He did the shot put first. Here he is with his shot put team mates. They look cool under pressure, but you could definitely feel their tension as they stood here waiting their turn in line.
Here's a play by play sequence of his shot put.
Trevor looks like the kind of kid that could chuck the weight really far, but this sweet and gentle boy does not have a lot of aggression yet. He finished shot put at the middle of the pack which we were thrilled with.
Here's a picture of the peanut gallery that followed me around the track for 3 hours. They look like a fun crowd, right?
We brought our picnic lunch, plenty of water, umbrella and picnic blanket. They had fun playing with all the other little kids that got dragged to their siblings' track meet. So it really worked out well for all of us.
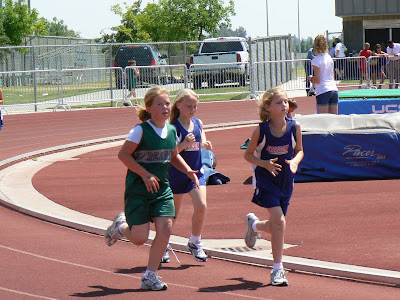
Here are some pictures of friends and cousins that also participated in the track meet. (Our team is the one in green) Emma ran the 800 and Jake ran the 100 - check it out, his feet are both totally off the ground!
And here's Trevor at the start of his 800 meter race. He tries so hard to do his best and we are so proud of him for that. (He's the one in green on the far right.)
Go Trevor Go! He ran the entire way. 2 full laps around the track = 1/2 mile. That's a long way man! Hopefully he'll get to run a shorter distance at the next meet. Trevor was much more calm and collected at this meet compared to his first few cross country races. Now he's more confident and comfortable in the sporting atmosphere. We are so proud of him for choosing a sport and sticking with it.
These are Trevor's good buddies: Jacob, Jake, Spencer (he goes to another school, but was also at the meet), Emma and Trevor. It was so nice to be surrounded and supported by good friends that cheered each other on.
Trevor, keep up the good work! You are our first track star!
Monday, May 11, 2009
Jackson the Gymnast
Jackson started gymnastics last week. I was lucky to find out that there was a class for his age group that meets at the same time as Lizzie's. So now they both get to go to gymnastics during the same hour each week!
Jackson's teacher is a patient patient woman. I don't know if she has any kids herself, but she knows how to work these 3-year-olds and MAKE THEM do what they are supposed to do. Jackson has been overly excited his first 2 sessions and she has to remind him at least 25 times during the 45 minute class to "sit down Jackson" or "it's not your turn Jackson" or "come back here Jackson". His line is, "Jackson's turn" repeated over and over and over until his teacher acknowledges him and tells him he has to wait until the other kids are done.
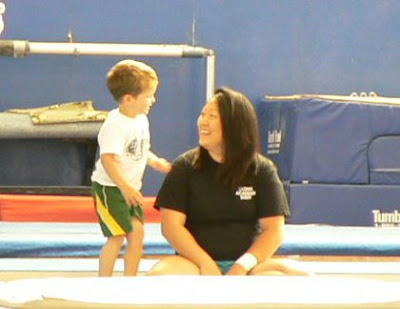
Here he is with his cute teacher. And the other picture is of him sitting on his butterfly mat, not so patiently waiting for "Jackson's turn!"
The first video is 59 seconds long and the second video is only 6 seconds. (I think his teacher likes being able to throw him around a little.) They do a miniature version of the vault in this class. It's so cute!
He loves having his own activity and his own teacher. So, who knows how long we'll stick with this gymnastics plan for ol' Jackson, but for the meantime it works for all of us.
Sunday, May 10, 2009
Mother's Day Goodies
In years past, Jeremy has gone completely overboard with his Mother's Day Breakfast creations. Click here to see my "plate" from last year. While his intentions are great, (he just wants to spoil me and give me love through food - which I totally get - we are food people) I simply could never eat ALL THAT FOOD! I requested one entree for breakfast this year - STRAWBERRY SHORTCAKE. For breakfast. I was shocked at his self restraint. He made only strawberry shortcake and cinnamon rolls. It was the best Mother's Day breakfast ever (besides the video taping the whole thing - there wasn't an ounce of make-up on my face and my hair was soaked from my shower 2 minutes before). Check it out - it was on a real plate this time! Fresh strawberries, chocolate syrup and chocolate shavings for garnish. What a guy to remember the presentation. And there were 2 beautiful roses to boot. Gorgeous!
The kids presented their homemade cards and there were more roses waiting downstairs. My toes were beautified the day before at my Mother's Day pedicure. Aren't they so lovely?
Lizzie was proud of her Mother's Day gifts we made at Joy School a few days before. We made homemade freezer jam from Robb's home grown Green Gage Plums. Yes, GREEN JAM. It is quite tasty and all the moms and grammas loved getting a homemade treat from Lizzie.
Thanks to my family and sweet husband for a fabulous Mother's Day. I felt so loved and special.
Saturday, May 9, 2009
I'm "hooked" on you!
So I found these most authentic old schoolhouse coat hanging hooks on ebay. 10 hooks for 5 bucks or something like that. I couldn't pass them up because I am a sucker for new ways to organize the house. The first 5 got used up here.
The other 5 I reserved for a special backpack hanging rack that I've been wanting to make since the first time I drooled over them on my computer screen. I finally figured out the best spot for the rack and set to work after our last painting project.
The wall on the right of this picture (the one that heads down the short hall toward the blue bathroom) is right in front of the garage door entrance to the house. I had a lonely mirror hanging there before and figured it could use some company.
So I took an old piece of wood (here's a bonus - the piece of wood was already the right size - no cutting involved!). Sprayed it black. Sanded it up slightly for an aged/distressed look that I hope NEVER goes out of style. Is it already out? Please don't tell me! It works so well for our rough and tumble crowd. (And just you wait for my next artistic adventure - more distressing to come...) So after the sanding I screwed all the hooks just where I wanted them. Screwed the board into the studs in the wall. And rehung the mirror over it. Perfection!
Here's a close up of one of the hooks. That is some authentic rust on that bad boy. I love it!
The kids were thrilled with their new backpack station too. They walk in through the garage door, hang up their packs like perfect children do, then kick off their shoes, leave them wherever and toss their socks over their shoulders as they run out the back door.
Next we'll need a solution for the shoes. Any ideas?
Friday, May 8, 2009
Living Room Makeover
We finally got around to painting that living room during the week of Spring Break. (That was back at Easter time, just last month.) It was no easy task by any means. Those walls go up 17 feet and we are not the types to get out and rent scaffolding. That meant using a super tall leaning ladder and climbing up and down and up and down to get all the way around the edges. Ahem... Jeremy went up and down and up and down. I am waaaay chicken to climb up that high. I did settle on the color Bungalow Gold from Lowe's. It's one of the Eddie Bower Signature Colors. I am so drawn to those rich hues. I am still lacking in my attempts to tie the two rooms together. This room will need many more pops of the blue color from the family room to make it feel cohesive. I'm working on it. Maybe some homemade artwork or some more pillows.
So here are several "Before"s and "After"s for your viewing pleasure.
The piano moved to the wall where that brown chest was sitting before.
I just love this little vingette over the piano. The black just pops against the new paint. Mmmmm... it's so delicious to the eyes.
This is the opposite view of the room - standing with my back to the piano. Notice 2 pillows in the "blue" color of the Living Room. And it's hard to see, but there is the same blue in the new rug on the floor.
That's about it for this room. There are more projects that contiue upstairs with this same wall color, but that will be for another time. I am always amazed at what paint - just paint - will do for the feeling in a room. This makeover was so worth all the time it took to get it to this point. Special thanks to my excellent hubby for making my decorating dreams come true!
So here are several "Before"s and "After"s for your viewing pleasure.
AFTER
Ahhhhh. Color! Doesn't it feel so much warmer?
The piano moved to the wall where that brown chest was sitting before.
I just love this little vingette over the piano. The black just pops against the new paint. Mmmmm... it's so delicious to the eyes.
This is the opposite view of the room - standing with my back to the piano. Notice 2 pillows in the "blue" color of the Living Room. And it's hard to see, but there is the same blue in the new rug on the floor.
AFTER THAT
AND FINALLY
the finished product
Those wrapped fabric frames look soooo much better with the dark color behind them. And I just had to give you a visual treat with the bathroom color peeking down the hallway.AFTER
(Again, same room, different view.)
I think the wall color totally fixed the problem. The black frames look awesome next to this rich caramely color. I'm even ok with all the pictures not all being in black and white.(Again, same room, different view.)
That's about it for this room. There are more projects that contiue upstairs with this same wall color, but that will be for another time. I am always amazed at what paint - just paint - will do for the feeling in a room. This makeover was so worth all the time it took to get it to this point. Special thanks to my excellent hubby for making my decorating dreams come true!
Thursday, May 7, 2009
kids say the darndest things
The scene: I'm changing Jackson's diaper. It's totally empty. No peeps, no poops, but it totally stinks!
Me: Whew! Jackson made some stinky toots!
Jackson: No. Mommy made toots!
Me: Excuse me?!
Jackson: Ha ha. Mommy toot.
The scene: Lizzie and I are reading Peter Pan. Trying to lure Jackson over to story time, I say...
Me: Jackson, come see Peter Pan and Tinker Bell.
Jackson: (Takes his time thinking about the offer and starts saying...) Tinker Bell. Tinker Bell. (I could almost hear the gears in his mind shifting as he started singing...) Tinker Bell, Tinker Bell, Tinker all the way...
Wednesday, May 6, 2009
Headboard Makeover
BEFORE
AFTER
The bedding, lamps and sidetables are all the same. I just got tired of hitting my head on the silly metal fleur de lis tie backs that were holding the curtains in place. I found the beautiful-perfect color-just the right size-striped fabric at Target. It was a curtain panel - just one - on the clearance rack just sitting there waiting for me to pick it up. And how much did that fabric cost? Only $6.08. Ooooh, I love a good deal. We purchased a piece of plywood for about $30ish.
Here's how the project went down:
1. I wrapped the wood in some egg crate foam we already had - 2 layers of it to give a nice padded look - and staple gunned it in place. Don't worry, I put the lumpy side to the board so the flat side of the pad was facing out.
2. Wrapped it again with a layer of quilt batting (add about $13 more) to smooth out any bumps from the egg crate foam. And staple gunned it down.
3. Wrapped it again in a white sheet that was also just the right size (and that we also already had and was unused because who really uses the flat sheet anyway? Not us.) to smooth over the quilt batting and staple gunned that in place. (And now in retrospect we could have probably skipped this step - I must have been very concerned about having a "smooth" finish, thus all the extra layers)
4. Wrapped it a final time with the striped fabric and staple gunned it in place - we used A LOT of staples so add about $5 for staples to the entire cost of the project
5. Jeremy screwed a 2x4 into the studs in the wall behind our bed.
6. I screwed 2 very industrial wall hanging hooks (+ $2.50 for those) into the back of the headboard.
7. I also screwed 2 super screws into the 2x4 to hang the headboard from.
8. Jeremy and I lifted that beast of upholstered plywood, foam, fabric, and staples up and onto the screws.
9. Wah-lah! That took about 3 hours total for the project. TOTAL COST: about $56.58 for a stunning headboard. Not too shabby. Or maybe it IS shabby - shabby chic that is.
Subscribe to:
Posts (Atom)